Automatic translation (Original)
I decided to make a new OnStep controller based on the Wemos D1 R32 (ESP32) and CNC3. The controller based on the Arduino Mega + RAMPS clone works, but has performance limitations, which in practice results in lack of precision during long position changes. Recently, on the OnStep website, it is written directly that it is too slow. ESP32 seems more promising. Additionally, it is small and requires almost no soldering and I had 2 weeks before going on vacation that I have to do it already :)
Wemos D1 R32 (ESP32) + CNC v3 components are available for purchase immediately. Are cheap. I can also use some work from the Arduino Mega project.
Components:
| Wemos D1 R32 ESP32 | |
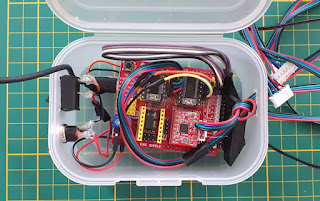
| Shield CNC v3 | |
| RTC DS3231 module | |
| Case | |
| Stepper motor driver LV8729 2 pcs and A4988 1 pcs | |
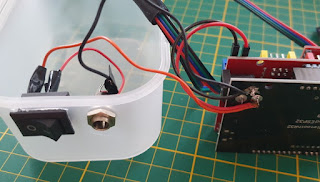
| DC 2.1 / 5.5 socket and a few meters extension cord for this plug | |
| bistable rocker switch |
A few links
OnStep group website
Wiki page
Project author's website http://www.stellarjourney.com/
Wiki: The WeMos R32 with CNC V3 Shield
Thread about LV8729 adjustment
Connecting to the CNC
CNC v3 was created to support 3D printers. But OnStep has very similar needs: support for several stepper motors by stepstick controllers, connecting devices via serial and I2C ports.
Here's what I connected in the current version of the controller:
1. Two LV8729 controllers to control telescope's RA / DEC axis motors and A4988 to control the focuser.
Jumpers for setting microstepping are led out under the controllers. The speed is determined by applying voltage to the appropriate stepstick pin, i.e. by shorting the appropriate jumper. For LV8729 I set 64, for A4988 16. Calculator, for example here. And here is the description of LV8729.
2. RTC DS3231 module for operating the clock on the I2C link
The page describing the connections suggests to give up the clock, but I already had it from the previous project, so I connected it. It is enough to properly connect to the I2C output and set the module model in config.h (at the configuration generation stage).
Power
To work, the controller needs voltage in various ranges for the microcontroller and the CNC. 12V is in both of these ranges. I have a 5A power supply and a 9AH battery, so I chose this power supply. I connected everything to the 5,5 / 2,1 plug on the housing.
Parameter Configuration and Generator
- In the excel document (download here) you need to set the parameters of the drives.
- The data must be filled in on the Configuration Generator page . Some must be copied from the fields listed in excel.
- Press "Generate"
- Replace the downloaded file with the config.h file in the OnStep directory.
- That's all point 7 in the chapter below.
- Stepper-Steps - the number of steps per revolution of the stepper motor. I have 200.
- AXIS1_DRIVER_MICROSTEPS - microsteps set for tracking to RAMPS. For me 32.
- GR1 - gear ratio on gears or planetary gear. For DEC, I have 60 teeth out of 20, which is a value of 3. For RA, I have 40 teeth out of 16, which is a value of 2.5.
- GR2 - the number of full revolutions of the telescope micromovement knob for 360 degrees rotation of the telescope tube in a given axis. If you do not find these parameters for your assembly in Net, it only remains to measure it empirically. For example, set the tube vertically (a spirit level will be useful) and rotate it until it reaches the level. Then you need to multiply it by 4. For my CG-4 these are: RA = 130, DEC = 64
- SLEW_RATE_BASE_DESIRED - expected tube speed in fast mode (in ° / s). If you give too high a value, the equipment may not be able to cope or the motors will work loudly. At the moment I am giving 1. It seems to me a good compromise between volume and speed.
Generator:
- MICROSTEPS_GOTO - microsteps for fast motor movement. For me 2.
- Automatically Start Tracking - useful when we test the motors and we do not have the ability to control the telescope's movements yet. But then it's better to turn it off.
- MFLIP_SKIP_HOME to ON, thanks to which it does not return to the starting position when changing the position at a long time
- PIER_SIDE_PREFERRED_DEFAULT on EAST. I perform the tests on the balcony and I prefer the telescope to always be positioned on one side of the mount, in my case the eastern one.
Installing the software
Detailed instructions for installing OnStep on ESP32 + CNC3 are here . In short, you should:
- Install the Arduino IDE
- Download the OnStep code from GITHUB by selecting Code -> Download ZIP
- Unpack it to some directory and open OnStep.ino in IDE
- Add in File-> Preferences "Additional Boards Manager URLs" the value "https://dl.espressif.com/dl/package_esp32_index.json" (if there was something, add a comma)
- In Tools> Board> Boards Manager to install ESP32
- Set in the menu Tools-> Board-> ESP32 Dev Module
- Select the port that will appear after connecting the board to USB (the number can be checked in the Device Manager)
- Overwrite the config.h file generated in the chapter above.
- If you do not have a library for RTC DS3231 by default, you will get an error. Go to Sketch-> Include library-> Manage Libraries and search for 'RTC by Makuna' on the list of available libraries and install.
- Press "Upload" and wait for the message that it was successful.
Communication
There are 4 ways to connect to OnStep.
1. USB cable connected to Wemos D1 R32 port. In my case, this is how I connect to Astroberry on the Raspberry PI 4B, which is running the Indi server.
2. WiFi connectivity . Requires the ESP8266 microcontroller to be connected to the serial port on the CNC. I have not implemented it at the moment.
3. Bluetooth connectivity . Since bluetooth is on ESP32 it works without any additional work. Yes, you can connect applications on your phone and computer. It works very stably
4. Ethernet port . I did not explore this solution because it was not practical for me. Details are in the OnStep Wiki.
Control
- OnStep start (a few seconds after starting you hear a click from the motor)
- Searching for a bluetooth device called OnStep and connection (it works fine for me if I delete the remembered connection every time I restart OnStep and search again)
- Launching the OnStep application on Android (if the device was restarted, it is better to kill the application and restart it after BT connection)
- You need to configure the connection type once in the application. Select the three dots in the upper right corner and click Connection.
- There, it is also worth setting "Observing Sites" to your geographic position.
- Setting the time and date in the "Initialize / Park" menu
- Next, you can select the position in this application or switch to, for example, Stellarium Mobile in the PLUS version (it cost about PLN 40, payment in the application). It will work on the same bluetooth connection. Once set, it will remember the settings. Here you can see the position of the telescope, you can also indicate a new position on the map.
- If the telescope begins to diverge with the indicated target, you can always switch to the OnStep app. Use the Tracking option to correct and update the display.
- Sky Safari 6 PLUS works similarly to Stellarium (unfortunately it also costs about PLN 36). One note here: do not turn on the time setting, because it will set the time shift incorrectly. I haven't figured out why yet.
Case
Summary of the first stage
Next steps to do / describe
- At first I was thinking about resuscitating the Smart Hand Controler, but I just ordered the GamePad bluetooth from this Bluetooth GamePad Option description .
- GamePad requires Smart Web Server based on additional ESP32. Best in the D1 mini ESP32 version, although others are also suitable.
- Replacement of cables for motors on RJ45 with rigidly fixed ports on the assembly. Choosing RJ45 over RJ11 or RJ12 is conscious. A much larger selection of sockets and cables, and for a much lower price.
- Connecting Onstep to Astroberry on Raspberry Pi. The USB connection is already working. This allows applications to connect to the Indi server on the Raspberry Pi.
- The use of PHD2 operating on Astroberry for guiding, i.e. correction of following the movement of the observed object.
- New handy case, housing OnStep and Raspberry Pi. The Kradex z78 was on hand .


Brak komentarzy:
Prześlij komentarz